A great way to use Pinterest in the classroom is, obviously, to get projects from. There is an endless source of projects that can align with your specific standards or frameworks for the classroom, and if not, most the time you can fix it so it does. The great part about this? You already have images and steps! No need to go and bother yourself with having to take pictures because they're right there for you.
Now, as I promised, here is the project I put together for you. It's easy and fun and you can create so many things from it. The project is paper beads.
STEP ONE:
In this step you gather your material. The materials are a ruler, pencil, colored paper (multicolored paper looks best), glue, scissors, toothpick (I used a Q-tip stick), and thread.
STEP TWO:
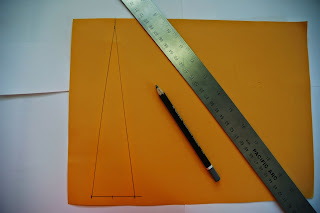
In this step, at the bottom of the page mark 1 inch, 2 inches, and 3 inches. Then at the top mark 2 inches.
STEP THREE:
Now connected the dots to create an Isosceles triangle.
STEP FOUR:
Then cut it out.
STEP FIVE:
In this step you take your toothpick and roll the triangle up. Bottom to tip.
STEP SIX:
Put a drop of glue on your bead and roll it all around the surface to glue it down. Afterwards slide your bead off the toothpick.
STEP SEVEN:
Make another bead and slide a piece of thread through the two.
STEP EIGHT:
Now take one end of the thread and put it through the opposite end of the other bead.
STEP NINE:
Pull the thread through and enjoy your beads. You can continue to add beads and create necklaces, bracelets, or anything you can come up with.
Here is one of my finished pieces.


